Chains
To create chains for my model, I modelled some chains linked together which I could then duplicate along a curve.
With help from this tutorial I created a chain by selecting the object and the curve I wanted it to attach to, and used the attach motion path option. It was important to keep checking how many frames the animation path was to ensure that the duplicated models were spaced appropriately. To ensure that the direction of the chain followed the direction of the curve, I went to the Motion Path Attributes, selected the Follow box, and changed the Front and Up axis accordingly.


Then I used the Create Animation Snapshot tool to duplicate the chains across the curve.

Once I was happy with results, I made sure to delete the history, so that when I deleted the curve, the chain would be unaffected.
Clothing & Hair
This is a render of the character so far with the texured face, and then clothing and hair. I will hopefully be able to post a video showing the cloth simulation soon, and I have begun working on the hair simulation. Then I will need to add jewellery, the crown, and texture the accessories.

Clothing WIP
I have begun modelling the components of the clothing and accessories for the character:

UV Unwrapping
Uv unwrapping has proved to be the hardest part for me so far, as I have struggled to find the best way to achieve a decent unwrap without too much hassle. I looked at using the programe Headus UV Layout, and while it might be an easy choice for some, when I tried to unfold certain parts of the mesh, it resulted in a lot of stretched and overlapping uvs:

I also tried the unfolding process that was already within Maya, however this proved to be quite tedious as I had to cut and re-sew many of the edges and try and reposition them correctly. This also resulted in the UV map no longer matching with the original bump map I had used:

I then found out about the UV Master plugin on ZBrush and using protect and attract, I tried to guide where I wanted the seams to go:

After unwrapping and flattening to see the UV map, this was the result:

I then created a new bump map based on this UV map:

And created a new mesh:

I can now take the UV map into Photoshop and begin painting the skin texture.
Lowering the polygon count
Once my sculpting was finished, I couldn’t possibly leave the polygon above 1 million as this would make it more difficult to work with and would take a much longer rendering time.
On ZBrush, I created a normal map and exported it out as a BMP (2048×2048):

I then applied to my lower resolution model, resulting in the illusion that the model had detailed sculpting but with a much lower polygon count. The final smoothed version came out as having 94,584 polygons and 94,702 vertices.


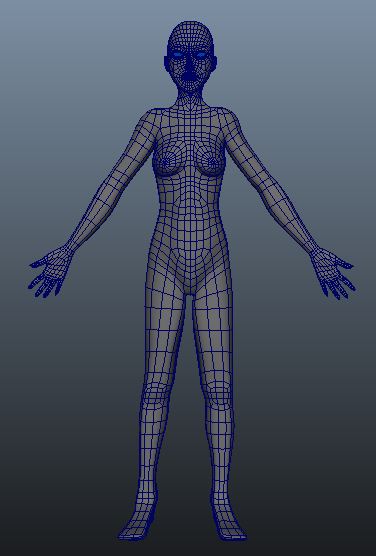
Base Mesh: Finished…!?
This is hopefully the final base mesh for my character. I will then be taking it into ZBrush where I can sculpt more details and make it more organic and realistic.


Hands
To go with my characters antagonistic personality, I wanted her to have sharp nails, almost like claws:

So using reference images I was able to create a similar effect:

Modelling continuation…
As I was not happy with previous versions of my model, I re-did the head, as the topology wasn’t correct, particularly around the nose. I have also added arms and hands. I have included screenshots of the head after subD-ing.


Polygons…
Now that I have started the base mesh for my character, I plan to create a high polygon model at promotional art standards. However once this is finished, I will be re-topologising the model into a low polygon version, one that could be used in-game. I have looked at the difference between the promotional art and in-game graphics of many games, as vertex and polygon counts are much more important in-game to suit the real time processing power of the console, whereas still images and cinematics are pre-rendered. With the constant progression of technology, games are becoming increasingly graphically abundant, allowing more artistic variety and high levels of detail.

In artistic games such as American McGee’s Alice, there is still a difference between the quality of the in game model and the poster art, no doubt due to the lush backgrounds as well as the in game characters that require processing:

Games such as Final Fantasy, Uncharted and Mass Effect are able to have high amounts of detail on their main characters in particular, with polygon counts around 20,000-30,000. In-game graphics are almost at a similar level to graphics used in pre-rendered cinematics.


Base Mesh WIP: The head
This is the model for the head so far, starting from a simple polygon cube, I tweaked it to fit the shape of the head. I have been trying to keep the topology correct whilst keeping the proportions of the features according to the model sheet. At this stage, the chin and mouth area doesn’t quite look right and the nose isn’t finished, and the features overall don’t look realistic enough for the style I want to go for. I have also yet to create some ears for the character.


